HDR Tone Mapping with Layers in Photoshop
 Create natural looking HDR tone mapped images in Photoshop with editable layers. This tutorial is an improved version of our Layered HDR Tone Mapping Photoshop tutorial from 2007. This new technique is capable of the same results but with a significantly smaller file size. We also added additional techniques to improve sharpness and contrast for a more realistic looking photo.
Preview of Final Results
Original image (middle exposure)
This is the original image of the middle exposure. For this tutorial, we used three images with a two stop difference in light.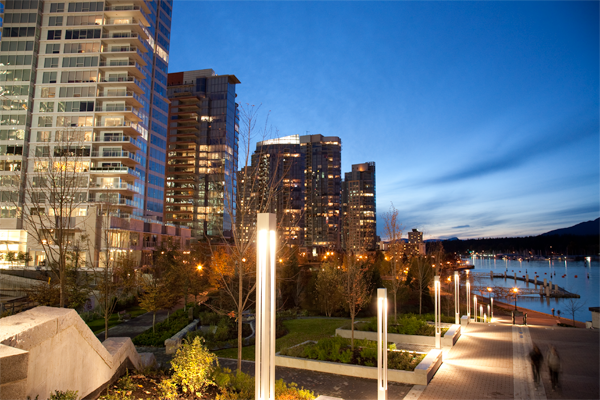
Realistic setting
This new effect not seen in our previous HDR tone mapping tutorial creates an image similar to the middle exposure except it just has more dynamic range. This is a good technique you can use to improve the quality of your image without making it look like it was HDR tone mapped. In case you do not see the difference with the original middle exposure, examine the tsrees and mountain in the background and the lights on the floor. The realistically tone mapped image shows more detail than the original image but still retains similar contrast.Rollover the image below to see the before and after effect.

Flattest setting
This is the flattest results this HDR tone mapping technique can create. This effect can be reduced by simply lowering the opacity of the layers. This technique works great with improving the looks of interior and real estate photos but can look a bit dull for landscape photos.Rollover the image below to see the before and after effect.

Stock Photos
If you don’t have a set of HDR photos you’d like to use, feel free to use the images below. Click on the images below to download the full size image.


Photographing images for HDR tone mapping
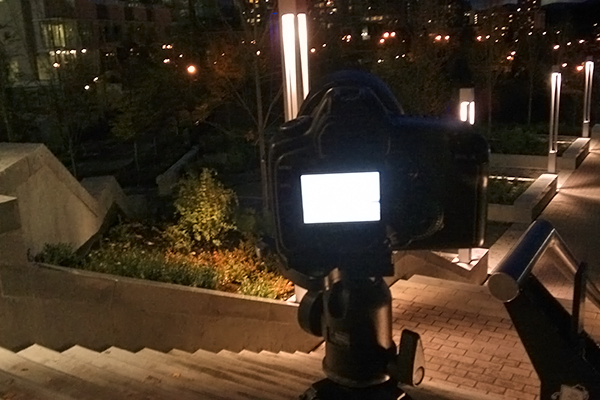
- You will need to shoot three exposures in the same position. To ensure that your camera does not move, put it on a tripod or a ledge so that it does not move while you shoot the three exposures. You can get away without using a tripod if your camera can shoot at 6fps or faster, you are using wide angle or image stabilized lens, and if the scene is bright enough to shoot at 1/250th of a second or faster. Simply enable high speed shooting mode on your camera. Keep your hands steady!
- Set your camera to aperture priority mode (Av). Using aperture priority mode is the safest way of creating a set of images for tone mapping. Avoid using shutter priority mode (Tv) as you can get halos and other artifacts in your image from the varying depth of field in your photo.
- Enable auto exposure bracketing (also known as AEB). If you are using a camera without this feature (ex. point and shoot cameras), skip this step. This feature is in almost every new DSLR camera and will automatically set the parameters to create three images of different exposures. This feature is usually found in your menu under AEB or Auto Exposure Bracketing. Refer to your camera manual if you do not know how to use this feature. For your first photos, set the bracketing to –2, 0, and +2. Some newer cameras let you go above two stops. You may try different bracketing settings depending on the dynamic range of your photo. Most DSLR have enough dynamic range that shooting at one stop increments is unnecessary.
- Set your cameras focus then switch to manual focus so that your camera does not refocus after taking each picture. Take three pictures and AEB will automatically create three different exposures for you.
HDR Tone Mapping Photoshop Tutorial
Step 1 – Importing the photos
Using Adobe Lightroom
Here is how you can import your photos through Adobe Lightroom. If you do not use Lightroom, you can skip this part. If you use Lightroom, this is a great way of working with HDR photos. Select the three exposure, right click, then choose Edit In > Open as Layers in Photoshop. The new tone mapped image will appear as a new image in Lightroom when you’re done. You can stack the four photos (3 exposures + 1 tone mapped image) for better organization.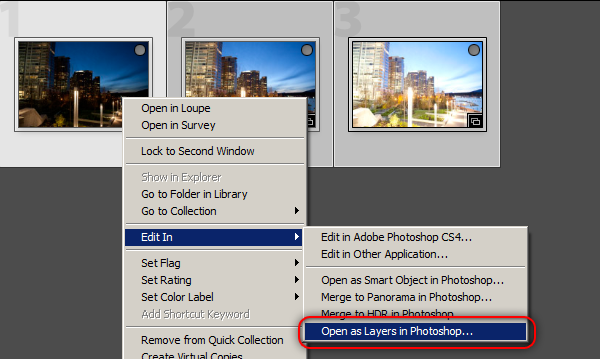
Using Photoshop CS3 or newer
With Photoshop CS3 or newer, you can load images into a document as layers easily with the Load Layers script. Choose File > Scripts > Load Files into Stack. Browse for the three images then click OK. Enable the “Attempt to Automatically Align Source Images” option. With this option enabled, Photoshop will automatically align the layers to compensate for slight movements. This works almost all the time but in case it doesn’t, you can disable it. Because you’ve already aligned your layers, skip the next step (Step 2 – Aligning the layers).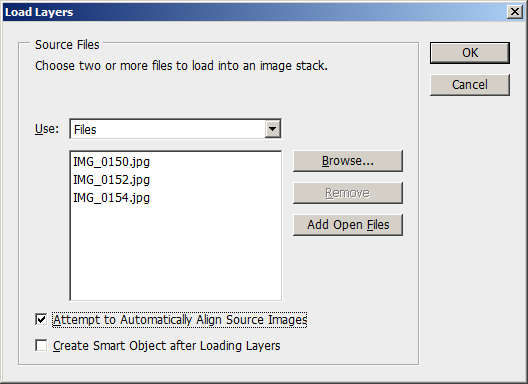
Using Photoshop CS2 or older
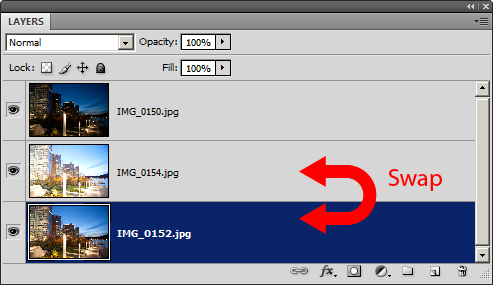
Open all three images into Photoshop. Tile the images so that you can see all three. While holding the Shift key on your keyboard, drag the layer of one document to another. Repeat this with the third image. One of the images should have three layers. Depending on the version of your Photoshop, you may have to reposition the layers so that they look aligned. You can close the other two images.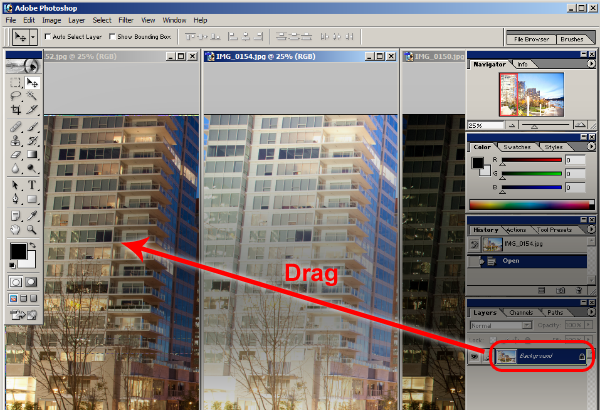
Step 2 – Aligning the layers
Photoshop CS3 or newer
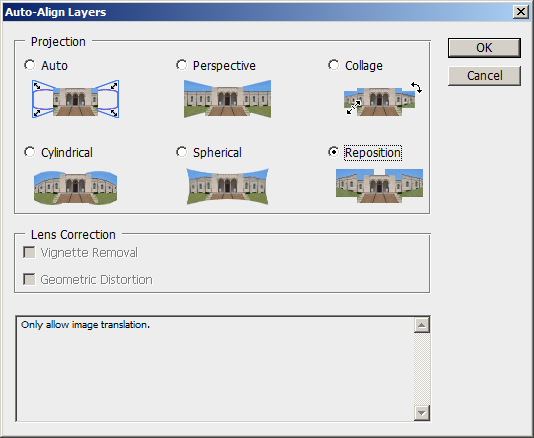
Photoshop CS3 introduced a new feature called Auto Align Layers. With this command, Photoshop can analyze your layers and automatically align them. Start by selecting all three layers. You can select multiple layers by holding down the Ctrl key on your keyboard.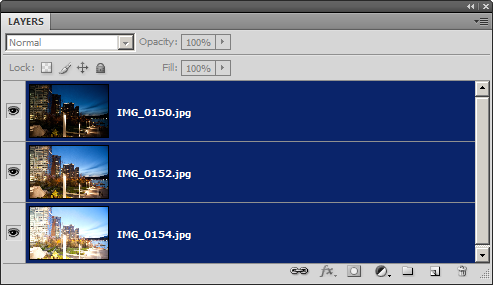
Choose Edit > Auto-Align Layers. Select reposition as the projection method then click OK.
Photoshop CS2 or older
Unfortunately, Photoshop CS2 or older do not have the auto align layers feature. You’ll have to manually align the layers. However, we’ll show you a neat trick to make this fast and easy. Here’s how to align layers manually: Hide the top layer then set the blending mode of the second layer to difference.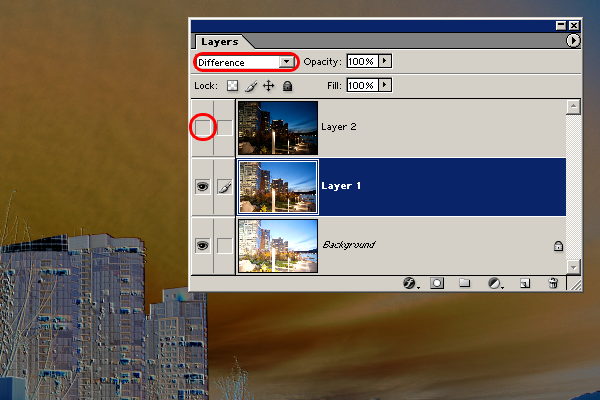
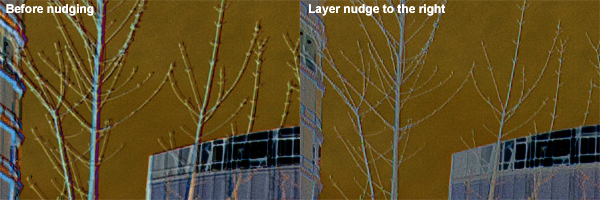
After you change the blending mode to difference, you’ll notice that your image will look inverted and most likely embossed. If there is no embossing, it means that your image is perfectly aligned. If there is embossing, you’ll need to align thelayer. To align the layer, select the Move tool (V) then press the arrow keys on your keyboard to nudge the layer until the embossing effect disappears. Below is an example of the before and after results of nudging.
Change the blending mode of the current layer back to normal. Enable visibility for the top layer then change the blending mode to difference.
Like earlier, select the Move tool (V) then use the arrow keys on your keyboard to nudge the layers so that the embossing effect disappears. Change the blending mode back to normal when you’re done. Don’t forget to crop the image! If you imported the photos from Lightroom, leave the image uncropped and crop it in Lightroom instead.
Step 3 – Applying the HDR tone mapping effect
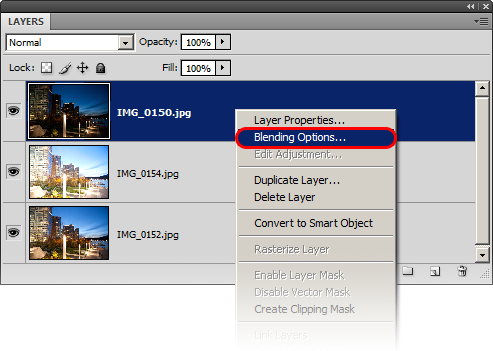
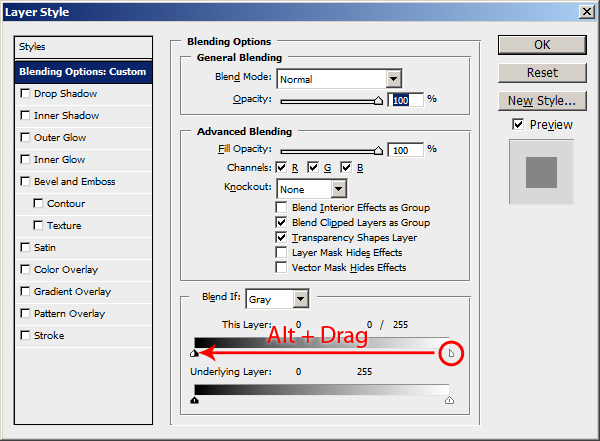
In the Layers palette, right click on the layer with the darker exposure then choose Blending Options.
While holding down the Alt key on your keyboard, drag on the

Now we’ll apply the opposite layer style to the overexposed layer. Right click on the layer with the overexposed image then choose Blending Options. While holding the Alt key, drag the
You’ve just tone mapped your image using the flattest setting!
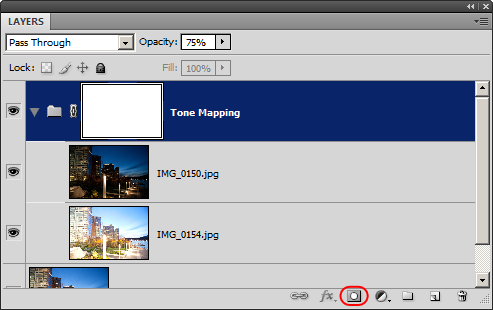
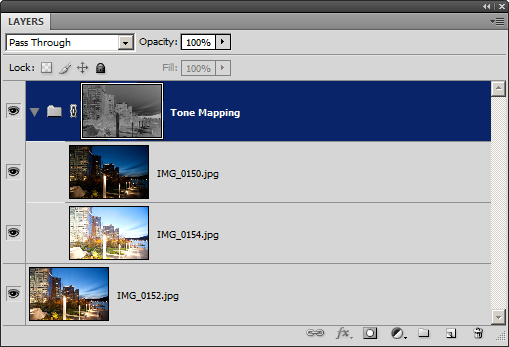
For better layer organization, create a new group by pressing the
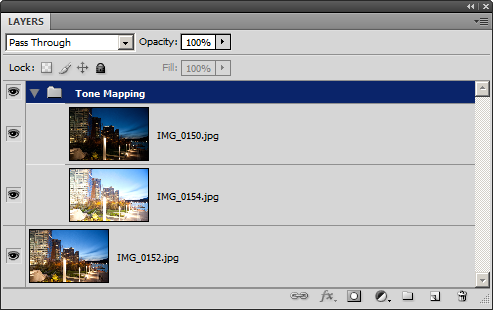
You can lower the strength of the tone mapping effect by lowering the opacity of the group.

Step 4 – Creating a realistic tone mapped image
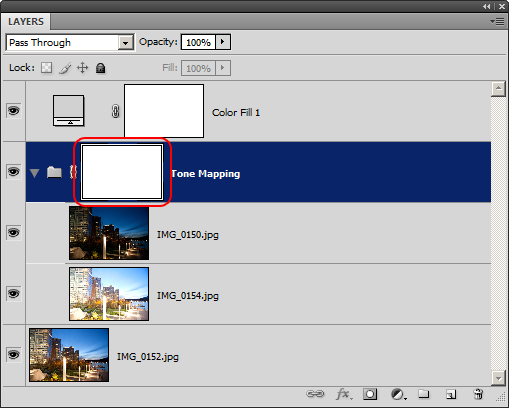
Start by adding a layer mask to the Tone Mapping group. To do this, select the Tone Mapping group then click on the
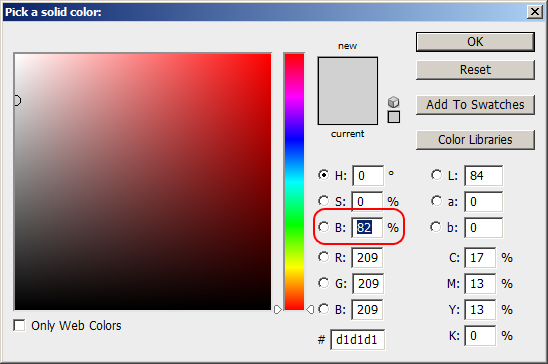
Add a new solid color adjustment layer with 82% gray. To do this, choose Layer > New Fill Layer > Solid Color. Enter in 82% the brightness field then click OK.
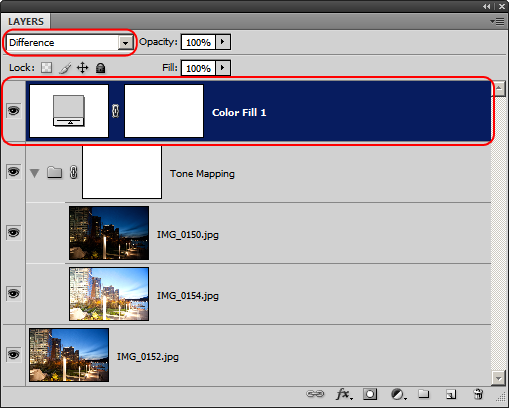
Position this fill layer as the top layer then change the blending mode to difference.
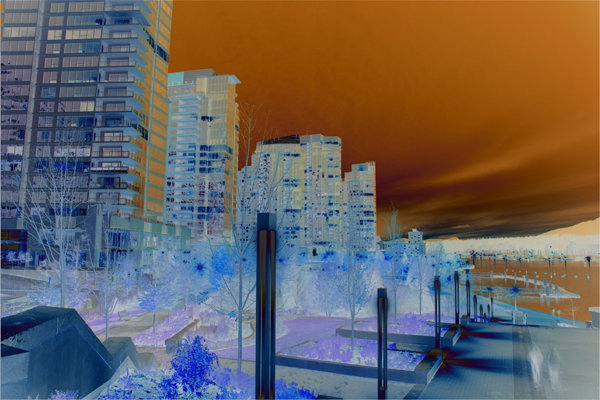
This is what your image should look like after changing the blending mode to difference. What you are seeing is the image map that we will be using in the layer mask. More about this will be explained later.
Click on the layer mask in the Layers palette to select it.
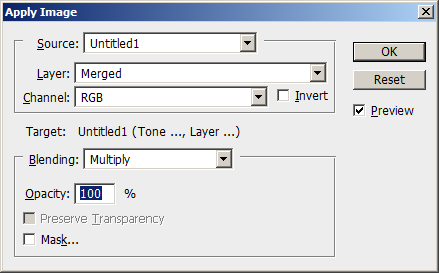
Choose Image > Apply Image. The default settings as shown below is fine. Click OK. This will put the merged image into the layer mask.
Delete the solid fill layer (top layer). As you can see now, the layer mask has the image in it. Anything dark in the layer mask means that the tone mapping effect is being hidden. What we just did was create an image map that hides the tone mapping effect in the midtones and only show it in the extreme dark and light areas of the image. This is how we can apply tone mapping without lowering the contrast.
If you're a pro at Photoshop, you can refine your tone mapping mask by using the curves tool in the layer mask. Simply select the layer mask then choose Image > Adjustments > Curves. Adjust the curve then click OK.
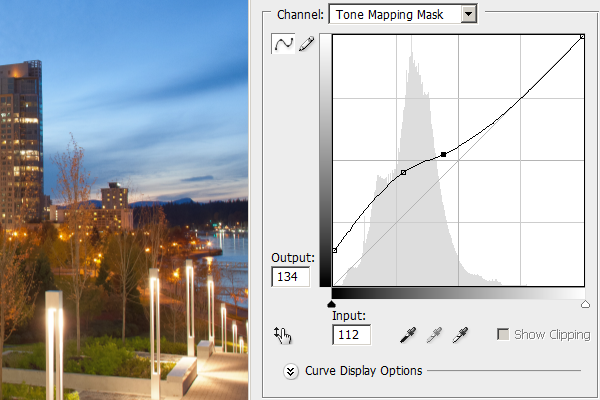
Here’s what our image looks like (with curves adjustment on layer mask). Rollover the image to see the before and after effect. It may take a few seconds for the image to load when you rollover.
posted by Ervin Usman at
10:30 AM
![]()


0 Comments:
Post a Comment
Subscribe to Post Comments [Atom]
<< Home